Monday, February 28, 2011

Embellished Flower Pillow

This weekend I made a new pillow for my bed, I swear I only have 2 or 3 more to make and then I am DONE with pillows...for a little while :) 

I found this pillow at GoodWill a few weeks back for a $1.00 and knew it would be a perfect addition to my bed, after all, it is a feather pillow! 

I measured the pillow and then used the pillow tutorial found HERE to make a "slip cover" pillowcase. 

After following the tutorial, I set my pillowcase aside and started working on the flowers. I found a template HERE and began cutting out the sizes I wanted. 

I then traced the shapes onto a piece of grey felt

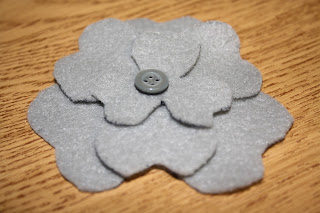
After cutting them out I searched through my button jar to find 3 of the same buttons. Here is what I came up with. 

Next, I took my sewn pillowcase and laid the flowers out to see how I wanted them. I then placed dots where the flowers should go. 

I begun sewing the flower and button on to the pillow case

It's important to make sure you aren't sewing the back flap down. 

Once all three flowers were sewn on, I placed my pillow in it's new case.

It's Perfect!!

TOTAL COSTS
Pillow..............$1.00
Fabric..............$2.00 
Felt Flowers....$0.25
Buttons...........FREE 
Thread........... $0.10

Grand Total...$3.35


Friday, February 25, 2011

Feature: The Hats off to Cardigan Tutorial

It's a {Feature Friday} here at CaitsCreates
This week I am featuring my fun and energetic blogging friend, Jennifer.
Jennifer Brasher
Jennifer has her own blog, Two Butterflies, where she is always creating/redoing something fun! This week she chose to share with us her awesome knock off cardigan tutorial. 

The Hats off To Cardigan


I fell in love with this sweater at ModCloth: 

The Hats off to Cardigan


It's $52.99 on ModCloth, and while that's not too outrageously expensive, I knew I could make it for a lot less. I had a brown scoop-neck top that I had picked up for $2 at the thrift store and some cream lace on hand.


Starting with the neckline, I pinned my lace in place, adding in little pleats, and machine stitched it down.


I used a wider piece of lace for the tie part of the bow and pinned it in place--I sort of pinched it together up at the top part of the tie and pinned. It stitched that down.


Then I cut another piece of wide lace and folded it in half for the bow--you will need 2 of these. 


PInch the raw end together and pin in place on your sweater to make 1/2 of the bow. Sew down and repeat on the other side. 


The finished Top: 


Thank you for sharing with us Jennifer!
Have a wonderful weekend :) 


Thursday, February 24, 2011

Deal of the Week

Walgreens FREE 8x10 Collage Print


If you miss today's deal, don't worry, they will have more photo deals throughout the week. They just might not be FREE! 


Dish Station

It's time. Thrifty Thursday is HERE! 

A long time ago, a.k.a Christmas Break, I bought this side table at Goodwill 


 This is a horrible iPhone picture, but before it was a light oak color. 


I primed it on one of the nice days and then attempted to spraypaint it black...I failed...miserably. So then I decided to paint it a brown color that I had left over from an entertainment center I had painted when I lived in my apartment {sigh...miss my roomies}. The paint wasn't dry when I left from Christmas break so this wonderful piece has sat in my parents basement since then. 

I finally went home this weekend and snagged it up. The plan was to put it here...


But there wasn't enough space between the heater (the wonderful white thing to the left) and the bed. So I thought REALLY hard and came up with a brillent plan... I could use it as my "dish station". Not having a kitchen really stinks because I always have dirty dishes, which we all know is NOT attractive, so I placed this "dish station" in my guest/craft/kitchen room.

On the top I have my drying rack and on the bottom I have my dirty dish tub hidden away.  


Then in the drawer I put my dish towels and cleaning supplies. 

I LOVE MY NEW DISH STATION! 

Total Costs

Side Table.......... $12.00
Primer................ FREE 
Paint.................. FREE 
Knob...................$1.00

Total..................$13.00


Linked Up to: 
Photobucket

Wednesday, February 23, 2011

DIY Showoff Silhouette Giveaway

So you know how I just said in my Subway Art post that I don't have a Silhouette Machine? WELL DIY Showoff is giving one away for free to one lucky winner! Since I want one REALLY bad I am trying to be entered the max amount of times...which is 5! :) If you are interested, hop on over to DIY Showoff and enter! The winner will be drawn randomly


Subway Art

I have seen a lot of Subway art ideas floating around Blogland lately 


A little of This, A little of That turned this ordinary mixer into something extraordinary


Tatertots and Jello did a Valentines Themed one

AND THEN 

I stumbled upon one that I absolutely {loved}


Funkymom Cards did this AWESOME "Oh the places you will go" one and I knew right then and there I had to do one as well! 

Most tutorials for the subway art said to use silhouette machines, but since I dont have one, I decided to use good ole' picnik.com. Here is what I came up with....


I haven't visited ALL of these places YET, but I plan to in the near future! 


Total Costs

Ikea Frame....................$5.00
Paper.............................FREE
Ink................................ FREE
Graphics........................FREE

Grand Total $5.00

Tuesday, February 22, 2011

Tootin' my horn Tuesday

Do you know what {BLOVE} means? 
If not, then you need to head over to Waking Lucia and see for yourself


BLOVE= Love + Blog 
AND
This week I was featured as the blog she's Blovin'!
You can see all the nice things Lucia had to say about me HERE


I also had another feature this week over at Creative Itch

Photobucket
Misty was a real sweetie and featured my Revamped Pillows. 


Thank you so much to these wonderful ladies for showing off my projects. It always makes me all giddy inside to know that others appreciate my love for thriftiness! 

{STOP BY AND CHECK THESE WONDERFUL BLOGS OUT!!!} 

Are you proud of something and want to share? Well toot your own horn by leaving a comment :) 

Monday, February 21, 2011

New Wall Art

{Painted Frames}

I have been wanting to redecorate my room but have struggled finding items to work. If you don't know my back story, let me fill you in really quick. 

{I live in a dorm} I am currently in grad school and work as a "graduate assistant" in a department on campus. Basically this position allows me to receive free tuition, free room (I actually have 2 rooms connected by a bathroom) and also a monthly paycheck. All around its an AWESOME deal! However, I have to admit... it took some time before I was use to living in a small space again, but I did it! The only complaint I have now is CONCRETE WALLS! 

I've learned that you have to be VERY creative when it comes to decorating with concreate walls (sticky tack and 3M strips have been my saving grace). So here is where I am currently at...


Last week during a trip to goodwill I found these decent frames for $1 a piece. 


I dug through my stash of paint and decided to paint them this awesome green color. 


I found these wall decals at GoodWill for $2.99 (they are originally from Target and were priced for $14.99). 


I placed the decals on the wall and then framed them with each of the frames. 

(Normally you cant see the decal lines on the wall, but you can here because of the flash)


Estimated Total Costs

Frames-------2.00
Decals--------1.50 (used 2 of the 4)
Paint----------0.50 (used half of the paint)
Sticky Tack-0.50 

Total Costs  $4.50


Friday, February 18, 2011

Feature: Black Apple Doll Tutorial

It's a {Feature Friday} here at CaitsCreates
This week I am featuring my creative and down to earth friend, Kat!

I have to admit that Kat has been a real inspiration to me this year. She turned her second room into a craft station and I thought, "OMG I need one of those". A few short weeks later guess what I had!?!? A new craft room :). Kat has created so many cool crafts from cards to dolls. Please stop by and check out her blog  Pins & Needles.

Black Apple Doll Tutorial 

Crafter Emily Martin created this doll pattern. She is a top seller on Etsy and owns her label The Black Apple. 

Materials: 

Black Apple doll pattern this can be found HERE 
1/4 yard of patterned fabric for the body 
1/4 yard of another patterned fabric for legs 
1/4 yard of muslin or skin-tone fabric for arms and face 
Felt for hair
Felt for collar
Ribbon and buttons for accessories
Acrylic craft paint (black, red, pink) 

Step 1: Download the pattern from Marthastewert.com and increase by 150%. Cut out your pattern pieces. 

Step 2:  Trace the pattern pieces onto the wrong side of your fabric and cut them out. Each pattern piece will specify how many you'll need. When tracing the arms and legs, trace two in the reverse direction (as shown below). When cutting out the arms and legs, I suggest cutting around the lines. This way you can sew directly on the line, which makes these tiny pieces more manageable. 

Step 3: Pin and sew the hair directly onto the doll's face. Sew a straight stitch along the bangs (the rest will be sewn later).


Step 4: Cut a collar from felt (you can be creative and cut whatever shape you like). Pin the collar to the front of your doll;s body. I also like to sew a tiny button to add some extra charm.


Step 5: Sew the face on the front of the body. Pin your doll's face to the neckline of the body, right sides facing. Sew a straight stitch along the neckline. She should look like this.

Follow the same steps to sew the back of the heads to the back bod piece. Afterwards you should have two pieces that look like this.


Step 6: Sew the arms and legs, right sides facing and leaving an opening at the top. Remember, you can sew directly on the line. You may want to trim the edges when you're done.

Next, turn the arms and legs right side out. I like to use a crochet hook to help with this. You could use any long, skinny tool that works for you. 


Finally, stuff the arms and legs. The long, skinny tool comes in handy here too. 


Step 7: Before I sew my dolls together I like to add a personal touch. Sewing on a personal label can make a gift extra special, not to mention credit your hard work :)


Step 8: Make a doll sandwich! Place your arms and legs inside the front and back pieces of your doll, right sides facing. Pin the edges, leaving an opening at the top of the head. 

Step 9: Sew around the edge of your doll, leaving the opening at the top of the head. Then, (this is my favorite part) reach inside and pull out the doll's legs to turn her right side out...VOILA! 


Step 10: Stuff your doll and close the opening in her head with a whipstitch.

Step 11: Give your doll a personality. Hair accessories and scares are my favorite finishing touches. But most importantly, she needs a face! I use acrylic craft paint to give my dolls eyes, a smile and rosy cheeks. I suggest using a pencil to lightly draw the face first before using a loaded paintbrush...just in case.

And before you know it...TADA!

Thanks again for sharing Kat! I hope everyone has a wonderful weekend filled with great weather :)